Your truck’s engine must be maintained regularly for maximum durability and performance. The pushrods and lifters are just two of the numerous parts that need maintenance. These vital components significantly affect the valvetrain’s performance, guaranteeing proper intake and exhaust valve action. Pushrods and lifters are usually cleaned during engine repair maintenance; however, you would want to clean them without removing them in several circumstances.
Pushrods and lifters can become contaminated with dirt, debris, and sludge over time. This buildup can lead to reduced engine efficiency, noisy valve operation, and, in extreme cases, engine damage. In this complete article, we’ll go over the cleaning benefits, the supplies you’ll need, the step-by-step cleaning procedure, and some crucial advice to help you keep the engine in your truck operating smoothly.
What are Push Rods?
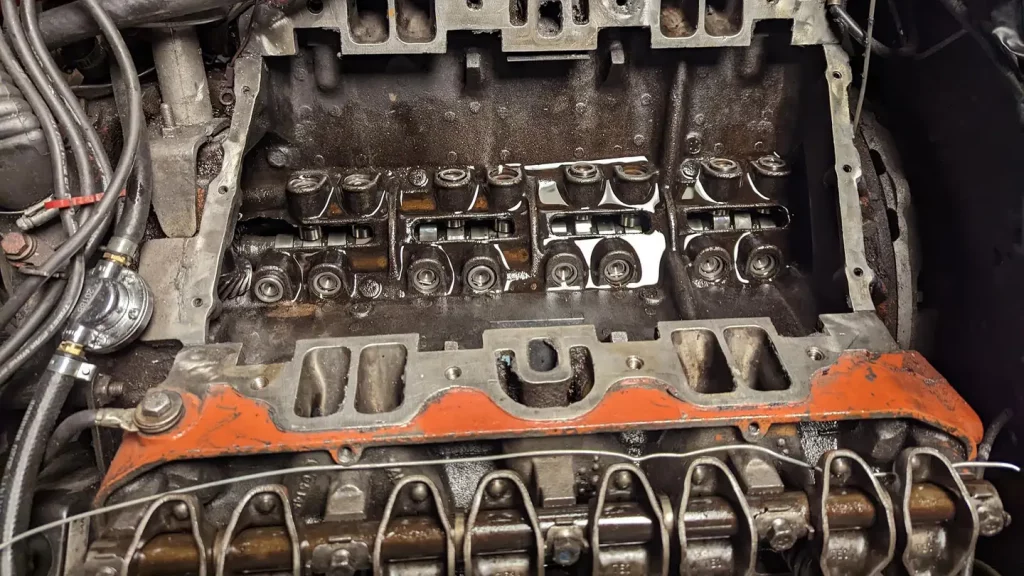
Pushrods are another piece of the valvetrain puzzle. Pushrod engines tend to get some flack for being outdated, but they have plenty of advantages. Pushrod engines tend to produce good low-end torque due to better air velocity at low rpm. Increasing the velocity of the intake air means the air and fuel mix better, providing better combustion and torque. A pushrod is required to transfer motion from the camshaft’s lobe to the valve. The pushrod’s length, wall thickness, end configuration, and material it’s made are all specific to the application. Like valve springs, pushrods are nothing overly fancy, but they are an essential element of the engine’s design, reliability and performance.
What do Push Rods do?
Pushrods are required to transmit the reciprocating motion of the valve lifter to the rocker arm. Both ends of the pushrod form a connection, which accommodates the angular movements of the pushrod in response to the straight-line motion of the lifter barrel on one side and the arc motion of the rocker’s arm on the other.
Since the pushrod is part of the valvetrain, it’s exposed to vibration and shock from the opening and closing of the valve against extreme coil spring pressure. Due to the energy necessary to open the closed valve at a fast rate, the pushrod has to endure excessive force while still accurately transferring the motion created by the camshaft profile.
How to Clean Push Rods?
Pushrods are vital to a vehicle’s engine, whose performance depends on cleanliness. If your truck’s pushrod is dirty with corrupted oil or old oil mixed with impurities, this will undoubtedly affect the regular operation of the engine. Follow the following step-by-step guide to clean your pushrods within the shortest time easily. Of course, there are alternate techniques in existence. We are only mentioning the one that we think is the best fit.
Step 1: Preparations
First, you need to prepare for the task. Cleaning the push rod manually is a dirty chore. Therefore, we advise you to wear goggles and gloves for protection against oiliness.
Step 2: Apply Cleaner
Once separated, apply brake cleaners or carb remover solvents on the pushrods. Only use small amounts since excess fluids can cause the sludge to increase.
Step 3: Soak in Water
After the cleaner has been applied, soak the pushrod head in lukewarm water for a small period of time. Rinse the head well to remove all excess water droplets after you have taken it out.
Step 4: Dry
By letting the pushrod alone in front of the fan for a while, you can dry it. A lengthier exposure to the light could alter the metal’s density, therefore keeping it out of the sun as much as possible. Install the pushrod into the truck after it has dried.
You can use carbon removers in addition to the brake cleaner previously suggested to clean the pushrod of all collected dirt and burned oil particles. Depending on the circumstance and your preferences, you can choose the chemical.
How Many Push Rods are in a v8 Engine?
A typical V8 engine has 16 pushrods – two for each of the engine’s eight cylinders. These pushrods play a crucial role in transmitting motion from the camshaft to the engine’s valvetrain, allowing the intake and exhaust valves to open and close at the appropriate times for combustion and exhaust processes.
What are Lifters in an Engine?
A lifter is a cylinder that sits between a truck’s camshaft and the cylinder valves. As the camshaft moves over the top of the lifter, it actuates, temporarily opening the valve. And because the intake and exhaust valves need to open at different times, each has its own separate lifter. Lifters can be designed differently, depending on the vehicle. For example, lifters on pushrod engines activate a rocker arm instead of directly pressing on the valve.
Hydraulic Lifters
First invented in the 1930s to reduce the noise from older mechanical lifters, hydraulic lifters are the most common variety of lifters on the market. However, they didn’t enter the mass market until the 1950s because of their higher cost.
Hydraulic lifters consist of a cylindrical body with an internal piston that protrudes from the top. Here’s how they work:
- Pressurized oil enters through a hole in the lifter’s body and flows into a narrow channel. This oil enters the internal lifter cylinder but flows freely out the other side.
- When the cam presses down on the lifter piston, it closes the channel. This locks the valve temporarily, even under high pressure, so gas can escape the cylinder.
- When the cam passes its apex, the lifter piston can rise, allowing the oil to flow freely again. It causes the valve to snap shut, preserving proper engine air pressure.
Mechanical Lifters
Hydraulic lifters were in their heyday from the 1950s through the 1980s, when they were found in nearly every truck on the road. However, some newer vehicles have started using mechanical lifters again. They might be louder. However mechanical lifters have a couple of distinct advantages over their hydraulic counterparts. First, they’re cheap and low maintenance, so they’re great for economy trucks. They’re also useful for performance trucks because they work reliably at higher RPMs.
There are two main types of mechanical lifters: solid lifters and roller lifters. A solid lifter is precisely what it sounds like a solid metal cylinder. As the cam rotates, it either presses down on the cylinder or allows it to rise. Roller lifters have a similar design but are engineered to mitigate the noise from solid lifters. Instead of a flat back, they have rollers on the back that allow the cam to rotate smoothly over the top.
How Long Can You Drive with Bad Lifters?
Just how long can you go on the road with broken lifters? If your lifters have failed or are failing, you shouldn’t drive more than 100 miles before taking your truck in for repairs by Bs Truck repair shop. If you keep driving with faulty or collapsed lifters, the inner part of the lifters could eventually come into touch with the camshaft, causing damage. When a lift fails, its interior can sink all the way to where it makes contact with the camshaft. As a result, your camshaft may need replacing within the next 10,000 to 15,000 miles since the roller on the lifter rubs on it, potentially causing damage.
A ticking or tapping noise coming from the engine is the most telltale indicator of a malfunctioning lift. This ticking sound can be intermittent or constant, depending on how often the lifter is used. It’s hard to miss because it differs so drastically from the hum of a typical motor. This significantly reduces noise and improves performance, particularly at higher RPMs. On the other hand, rollers have higher maintenance than an ordinary solid lifter, leading to higher mechanic bills in the long run.
How do Quiet, Noisy Lifters?
Once you verify the lifter ticking is not caused by a worn-out lifter or some other damaged part, the best thing to do is change the oil. Remove all the oil currently in the engine and flush it out before adding new oil. Ensure the new oil you are putting in is exactly the type the manufacturer specifies. If you can, make sure it is synthetic oil. If you can’t get synthetic oil, at least use a synthetic blend.
After changing the oil, you should let the automobile run for around 30 minutes to allow the oil to circulate throughout the system. After doing this, the lifter noise should stop if an oil issue causes it.
Try again to check if you have a component problem if this doesn’t fix the issue. Verify the rocker’s arm is securely fastened, the pushrods are straight, and the lifters appear unharmed. You can tighten or loosen the valve lash, which is the distance between the rocker arms and the valves. Although hydraulic valve lifters automatically adjust themselves, this might be the answer if all else fails. Admittedly, these are things many people can’t do without the expertise of a mechanic.
How to Clean Lifters Without Removing?
Hydraulic and solid lifters can get sticky, clogged, or become noisy as they are used. Most experts recommend removing the lifters to clean them properly, but removing them can be time-consuming and labor-intensive.
You can, however, clean lifters without removing them. Flushing the engine with an engine cleaner is the best way to clean the lifters without removing them and will get a large portion of the work done in all but the most extreme cases.
Step 1: Adding the engine flush cleaner.
The first step is to add your preferred engine flush to your engine. Open the oil cap and add the appropriate amount of cleaner based on your engine size. Be sure to follow the directions for your engine flush. Some people may need two or more bottles if they have a large engine. Once you’ve added the cleaner, close the oil cap.
Step 2: Run the engine to allow the cleaner to work.
After adding the engine flush detergent, you will want to start the engine and allow it to idle for about 15 minutes. This allows the detergent to work its way through your engine and through your lifters.
You may hear your lifters get a bit quieter the longer your engine idles, indicating that the engine cleaner is working on the lifters. After the directed amount of time has passed, you can proceed to turn the truck off.
Step 3: Drain the oil from your engine and remove the oil filter.
Once you’ve run the cleaner through the engine, depending on the directions for your cleaner, you may need to change your truck’s oil. Not all engine detergents need an oil change and can be left in the engine, but some will require it.
That said, if your lifters are making noise and you’ve cleaned them with an engine detergent, that dirt is now in the rest of the oil, and changing that is a good idea in general. Use jack stands to lift up the front end of your truck–be sure to use the appropriate jacks for your vehicle. Place an oil drain pan underneath your vehicle’s oil drain spout and then drain the oil from your truck. This process will vary based on the exact model of vehicle that you have. After you have drained all the oil from your truck, remove the oil filter. Once again, this process can vary slightly based on the make and model of the vehicle you own.
Step 4: Replacing the Oil Filter and Oil
After you have drained the oil and removed the oil filter, you will need to install a new oil filter and replace the oil in your truck. Ensure that the new oil filter is installed securely and that you have also put the oil drain plug back. Always do your research to learn what type of oil is recommended for your truck and how many quarts of oil your vehicle needs.
Step 5: Allow the New Oil to Circulate
After replacing the oil in your truck, you will want to turn on your vehicle and allow the oil to circulate throughout the engine. Allow the engine to idle for a few minutes, and then rev the engine a few times. If you have successfully cleaned the lifters without removing them, you should not hear any rattling or noise as the oil circulates.
What do Lifters do in an Engine?
The lifters operate the exhaust and intake valves. The lifters can move up and down due to the cam’s egg-shaped lobes. The lobe’s narrow, short end is the cam’s heel. The lifters move the valves into the open or closed position by being pushed up and down by the cam as it rotates. In non-overhead cam engines, the rocker is moved up and down by the rocker’s reciprocating movement with the push rod by the lifters. The front of the rocker moves the valve.
What Causes Lifters to Go Bad?
Two types of lifters are used in automotive engines: the hydraulic type which uses engine oil inside the lifter body to keep the valve lash within specifications, and the solid lifter which has no hydraulic system, which you must adjust manually. Lifters open and close the intake and exhaust valves and are subject to wear just like any other automotive component. Knowing what causes lifters to go bad can save a vehicle owner the major expense of engine rebuilding, should the lifters fail completely. If the engine misfires because there isn’t enough oil or there is engine damage to other engine components besides lifter issues, it’s important to know that you don’t need new lifters – there are other moving parts to consider.
How do you Adjust Hydraulic Lifters?
- Remove the valve covers if your engine still needs to be disassembled.
- You will need a breaker bar or a large 1/2 drive ratchet and socket to rotate your engine by hand via the bolt on the front of the crankshaft. This is much easier if the spark plugs are removed. Rotate the engine clockwise and watch the exhaust valve on the cylinder you want to adjust. If you’re unsure of which valve is the exhaust valve, look at your exhaust manifold or header, and the exhaust valve will line up with it. When the exhaust valve begins to open, stop and adjust that cylinder’s intake rocker arm. This is the point in the camshaft rotation where the intake valve is closed, and the lifter is directly opposite the cam lobe.
- Loosen the retaining nut on the rocker’s arm to remove tension from the pushrod. If the lifter is filled with oil, wait a minute or two for it to return to a neutral position. If you give it time, the spring inside the lifter will move the pushrod seat up against the retaining lock. If you install new lifters that are not oil-filled, you don’t need to wait. You can start adjusting right away.
- Gently rotate the intake pushrod with your fingers while tightening down the rocker arm retaining nut. When you first feel a slight resistance at the pushrod, you compress the spring inside the lifter. Turn the retaining nut down one-half to one full turn from this point. Lock the nut into position. The intake is now adjusted properly.
- Hand turn the engine again, watching the intake valve that you just adjusted. It will open fully and then begin to close. Stop and adjust the exhaust rocker arm on that particular cylinder when the intake valve is almost closed. This is the spot where the exhaust valve is on the base circle of the cam. Adjust the exhaust rocker just like you did the intake.
- Both valves on this cylinder are now adjusted, and you can move on to your next cylinder and follow the same procedure again. In summary, adjust the exhaust valve just as the intake is closed, and adjust the intake just as the exhaust valve begins to open.
How do you Check Hydraulic Lifters?
Hydraulic valve lifters are tested for their leak-down rate. A good lifter will leak down slowly, but the leak-down rate will be too slow if its plunger sticks. If its plunger is worn or the check valve leaks, the leak-down rate will be too fast. The tester (figure 3.25) consists of a base with a vertical standard carrying a ram. It has a cup with test fluid. The weight operates the ram on the end of an arm. A scale and pointer indicate the movement of the plunger. A watch is used for timing.
- Place the lifter in the tester cup and cover it with fluid. Either a special light oil or distillate is used.
- Place the steel ball in the push-rod cup under the end of the arm.
- Work the plunger up and down with the weight until the air is bled from the lifter and full of fluid.
- Adjust the length of the arm so that the point is in line with the top mark of the scale when the ram is just touching the ball in the push-rod cup.
- Raise the lever and let the weight and ram force the plunger down.
- Measured the time the pointer takes to move across the scale. This is the leak-down rate.
For example, a used lifter must take at least 5 seconds, but not more than 60 seconds to leak down, and a new lifter should take at least 10 seconds, but not more than 60 seconds. A Doubtful lifter should be tested three or four times. If a lifter does not test within specifications, it should be discarded and replaced with a new one
How do We Tell the Difference Between Solid Lifters vs Hydraulic Lifters?
Solid vs hydraulic lifters are a big debate, but let’s summarise it in short form. Solid lifters are mechanical components that directly transfer the motion of the camshaft to the valves. They consist of a solid metal rod between the camshaft lobe and the valve, transmitting the lift and duration of the camshaft profile to the valve. Solid lifters require periodic valve lash adjustment to maintain proper clearance, which must be done manually. Solid lifters are commonly found in high-performance engines where precise control over valve timing and lift is desired.
On the other hand, hydraulic lifters use a hydraulic mechanism to adjust the valve lash automatically. They contain a plunger or piston that is filled with hydraulic fluid. When the camshaft lobe pushes against the lifter, the hydraulic fluid is compressed, allowing the lifter to take up any slack in the valve train. Hydraulic lifters are self-adjusting, eliminating the need for manual valve lash adjustments. They are commonly found in modern engines as they provide quieter operation, reduced maintenance, and improved durability.